What to look for when buying a digital camera and why?
1. Megapixels
Go for as many megapixels as you require with the lowest pixel density.
- How many megapixels do you need?
The table below shows required megapixels for different sizes of print.
| Resolution |
Average Quality |
Best Quality |
| 2 megapixels |
8 x 10 in. |
3 x 5 in. |
| 4 megapixels |
11 x 14 in. |
5 x 7 in. |
| 6 megapixels |
16 x 20 in. |
8 x 10 in. |
| 8 megapixels |
20 x 30 in. |
11 x 14 in. |
| 10+ megapixels |
25 x 40 in. |
13 x 17 in. |
- What's pixel density?
Pixel density is the number of megapixels divided by the sensor size of the camera.
|
|
cambridgeincolour.com |
 |
|
 |
Larger sensor,
Lower pixel density,
Less noise. |
|
Smaller sensor,
Higher pixel density,
More noise. |
- Bigger sensors with lower pixel density are generally more expensive to make.
2. Lens, wide angle, zoom and macro.
All camera lenses have focal length ratings (e.g: 28-105mm) where the lower number (28mm) denotes the widest field of view and the higher number (105mm) denotes the full zoom/telephoto. Zoom lens are also expressed as 3x, 10x or 20x.
- Choose the lowest focal length possible to get the widest field of view.
| Standard and wide angle lens |
panasonic.net |
 |
 |
| Standard 35mm lens |
Wide angle 27mm lens |
- Choose the largest optical zoom.
| Zoom / Telephoto lens |
panasonic.net |
 |
| Different lens zoom shown above. |
- Disregard digital zoom as you could achieve the same digital zoom with software.
- Bear in mind that a small difference (a couple of mm) at the wide angle range makes a big difference in field of view, while the same difference in telephoto range does not make as much a difference.
- Large zoom lenses will require image stabilization to reduce camera shake, otherwise you'll end up with blurry photos.
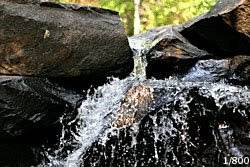
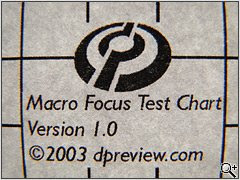
- Go for the smallest frame coverage in macro mode.
| Macro frame coverage |
dpreview.com |
 |
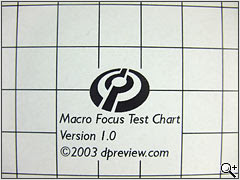 |
| Frame coverage: 38mm x 28mm (preferable). |
Frame coverage: 114mm x 58mm. |
3. Batteries.
Some cameras uses standard AA batteries while others uses proprietary lithium ion batteries.
|
Standard AA batteries |
Proprietary Lithium Ion batteries |
| Advantages |
- Easy to find and buy in an emergency.
- Comparatively cheaper than Lithium Ion batteries.
|
- Light.
- Can last for many shots.
- Rechargable and charger normally provided.
- Compatible batteries relatively inexpensive.
|
| Disadvantages |
- Heavy.
- Requires the use of rechargables.
- You buy your own rechargable batteries.
- You also buy your own charger.
- Long lasting rechargable batteries cost more initially but gives the most bang for the buck, also requires a good charger.
|
- Difficult to find in emergency, spare battery required.
- Original proprietary batteries can be expensive.
|
- Get Lithium Ion batteries if you can as they are lighter and have better capacity.
- If you must get AA batteries, then get good rechargables with low self-discharge rates and get a good charger.
- Remember that low self-discharge rates are more important than battery capacity (e.g: 1300 mAh). Find out more here.
- Get a camera with a battery that gives you more shots (longer battery life).
- Watch out for batteries that contains an integrated chip. Lately, some manufacturers (e.g. Panasonic, with their ID secure batteries) have included a chip into their batteries, resulting in cameras and camcoders that reject all third party batteries, forcing you to buy their expensive originals.
4. LCD Screen & Viewfinder.
- Get the largest LCD screen you can find, for better viewing.
- It should be as articulated as possible for easy viewing from all angles.
- Get an LCD screen with high resolution (measured in number of pixels).
- If possible get a viewfinder with high resolution and a diopter dial. The diopter dial allows people wearing spectacles and contact lenses easier viewing.
- If you are getting a DSLR, make sure it has "live view".
5. Data Storage Cards
- Choose as big a capacity as you can afford. Normally the highest capacity card is the most expensive and the second highest capacity normally offer the best bang for the buck.
- It is extremely important to choose a card with a high write speed. A card with a low write speed will not let you shoot in high speed or make high resolution movies continuously.
- Write speed is more important than read speed for a camera.
- Be aware that cards that advertises itself as "high speed" or "for video", does not necessarily have a high write speed, as reviewed here.
- For SD/SDHC cards, go for Class 6 (currently highest) as it guarantees a minimum of 6MB/s. If possible go for cards that maintains 10MB/s or higher.
6. ISO Range
Cameras usually lists it's ISO range as ISO100 - 1600 or ISO100 - 6400.
- High ISO (6400) range does not necessarily mean a better camera.
| Usable ISO Range |
dpreview.com |
 |
 |
| ISO800: Image usable. |
ISO3200: Image too noisy to be usable. |
- Instead go for "usable" ISO range. A camera may offer to take photos at ISO6400 for you, but if the photo is not usable, then it amounts to nothing.
- At the lower range, go for a camera which offers ISO100 or lower.
7. Aperture Range
Cameras usually lists it's aperture range as f/2.8 - f/4.4.
- Go for a lower aperture range (e.g: f/2.8-f/4.4 is preferable over f/2.8-f/5.6).
- Lower aperture values means more light gets into the camera.
- When more light gets into the camera, you can use a faster shutter speed if you want, otherwise you're restricted to a slower shutter speed.
8. Shutter Speed
- Go for a camera with BOTH the slowest AND fastest possible shutter speed.
- A camera with a minimum shutter speed of 60 s is preferable over another with a 1 s speed because a slower shutter speed (60 s) allows more light into the camera for great night photo shots.
- A camera with a maximum shutter speed of 1/3200 s is preferable over another with a 1/1000 s speed because a faster shutter speed (1/3200 s) allows you to freeze action and take great sports photo, without blurry images.
9. Flash
- Go for a camera with a long (powerful) flash range. Cameras with a short flash range (3m) does not allow you to use your flash to light up your subject more than 3m away.
- Go for flash compensation. Cameras with flash compensation allows you to adjust the power of the flash, to light up subjects near or far, according to your own choosing.
- If possible go for a camera that offers a hot shoe, so you may use an external flash if needed.
10. Lens Thread
- If possible, go for a camera with lens thread. Lens thread on a camera allows you to add lens or filters to your camera.
11. Camera Timings and Continuous Drive
- Choose a camera with a short start up time. A camera that takes 2 s to turn on is always preferable over another which needs 10 s before allowing you to shoot photos.
- Go for low "shot to shot" times. A camera that makes you wait before allowing another shot would be extremely frustrating.
- Get a camera with a high continuous drive, normally expressed as 5 fps or 13 fps (frame per second). A camera that let's you shoot 13 frames/photos per second continuously is preferable over 5 fps.
- Be aware that when talking about continuous drive and frames per second, many cameras restrict the number of photos you can take continuously. Choose a camera that allows you take as many photos continuously as possible.
12. Movie Mode
- Go for a camera that let you zoom when taking movies.
- Choose a camera that let you shoot movies in high resolution, preferably in HD (high definition).
| Video Standard |
QVGA |
VGA |
NTSC |
PAL |
WVGA |
HD720 |
HD1080 |
| Resolution |
320x240 |
640x480 |
720x480 |
768x576 |
854x480 |
1280x720 |
1920x1080 |
- Most cameras restrict the length of movies that you can make, so make sure you understand your camera''s limit.
- Normally it's 8.5 minutes in HD720 and about 20 minutes in VGA (depending on video compression), or up to 2GB whichever comes first. This is normally due to the file system (FAT32) limitations on your memory card and applies for all cameras using the same file system.
- These limits should be fine for most everybody, otherwise you should consider getting a camcoder.
- If possible get a camera with stereo microphones so that your movies sound much better during playback.
13. Raw File
- If possible get a camera that let you shoot using RAW format.
- RAW format is unprocessed raw data captured by your camera, saved to be processed later.
| Advantages |
- No loss of data compared to JPEG.
- Control over many camera settings after the photo is taken (exposure, contrast, sharpening, saturation, white balance, etc.)
|
| Disadvantages |
- Bigger file size compared to JPEG, requires more storage.
- Requires post processing with software, which is a lot of hard work.
|
- Bear in mind that many cameras that let you shoot RAW also allows you to shoot RAW+JPEG (giving you both a RAW file and a JPEG file). This may reduce post processing if the JPEG is acceptable, but requires even more storage as file size increases.
14. Weight, Dimensions and Ergonomics.
- Select a camera that's easy to hold with good ergonomics.
- Watch out for camera's that places buttons and sensors where you normally put your hands. This will cause you to accidentally covers sensors or unintentionally pressed a button.
- Light weight and small dimensions are preferable as they are easy to carry and travel.
- Bear in mind that lighter weight usually means more difficulty in keeping a camera stable.
- If you're mostly working in a studio, disregard weight and size.
15. Other extras and software.
- Some camera's let you shoot a panorama by sweeping the camera, while other forces you to take multiple shots.
- Make sure the camera you buy provides you with a range of software that fits your requirements.
- If you select a Canon camera, you can use CHDK to practically hack and enhance it beyond what the manufacturer offers.
References: